Introduction to Github
October 19, 2022 ・0 comments ・Topic: IoT
GitHub is a Version Control System (VCS) or Source control. Now let’s understand the Version Control System (VCS). Version Control is the practice of managing and tracking the changes to the software codes. VCS are tools that help developers to manage changes in source code over time. It also allows us to revert some files to their previous version.
Version Control System is divided into two types i.e (1) Centralised Version Control System and (2) Distributed Control System.
Centralized Version Control System
A Centralized Version Control System (CVCS) offers developers a collaboration environment using a central server. In this system, the server acts as a central repository in which every version of code is stored. This central repository allows multiple developers to access files and
they can pull them to their local repository (computer) and push them back to the server. The main drawback of the CVCS is we have to always get connected to a centralized server.
Nothing is maintained on the local repository.
Microsoft Teams Foundation Server is an example of CVCS.
Distributed Version Control System
Distributed Version Control System (DVCS) is a type of version control system that offers
developers to make a clone of the whole codebase including its full history. We don’t need to
connect with the server. Thus everyone collaborates on a project with a local copy of the whole
project on their computer.
Git is an example of DVCS.
In this tutorial, we will go through the basics of GitHub using CLI on Ubuntu.
Let’s Get Started :
First of all download git CLI on your machine.
> sudo apt install git-all -y
Above command will install git cli on your machine. Now check version of git by typing command
> git --version
After installing Git CLI follow below steps to create an account on github.
Step 1: Create your account or sign in on https://github.com/ .
Step 2: Create a repository by navigating + on the top right corner.

Step 3: Now give name to your repository, select public , select Add a README file, change
name of branch to ‘master’ by clicking setting and finally click Create repository.
Img. 2
Write name of your main branch :

Img. 3
After Clicking Create Repository your screen may look like this. Hurray, you have created your
first repository on github.

Img. 4
As the github repository is created now it's time to create a local repository in your machine.
Step 4:
Create a directory from which you want to add your codes to your created repository git.
Now to initialize this directory as a github repository on your local machine type followingcommand.
> git init .
Here “ . “ means current directory or you can give an absolute path also
> ls -al

Img. 5 commands
To confirm that your directory is initialized as git repository type ls -al command this will show
.git hidden directory is created. We will discuss about .git directory later.
Step 7: This is only one time procedure that you have to follow on your machine.
It is like adding git configuration values to local or global level projects. When you contribute
to the github repository the user name will be recorded.

Img. 6 git configuration
Step 6: Now we have to clone the github repository to our local machine. In the directory in
which we just initialize as local git repository, before adding any files or start writing codes.
> git clone https://github.com/Nimesh-Nagar/test_repo.git
You will find a link to your repository from the code tab at the right corner in green color. Just
copy this link and paste it after the git clone command. The whole repository will be
downloaded to your local machine.
Obvious question may arise in your mind that why we have cloned the repository now as we
haven’t added any file in github. The reason is the local repository on the machine should
contain the same data as that of the github repository.

Img. 6 github http link to clone repository

Img. 7 git clone command
Start writing your codes in this directory or just past your codes which you want to add to the
github’s “test_repo” repository.
Step 7: Type following command
> git add .
> git add <file_name>
→ First command will add all files and the second command will only consider the
particular file name.
The git add command adds all changes which have been made in the current working directorythe staging area only. Please remember that the changes are not actually reflected in thegithub repository until you run more commands.

Img. 8 git add and git status commands
you can check status of you git process by using
> git status
This is a very helpful command when you are not aware about the stage at which your code is
currently you can use this command.
Step 8: ( Optional ) This command will save your lots of time.
If you are thinking you have changed your mind, you have mistakenly added the wrong file or
wanted to make some more changes. This command is very useful.
>git rm --cached arithmetic_calculator.c

Img. 9 git unstage command
Step 9: Next command will be
> git commit -m “arithmetic calculator using c program”
The git commit command will save all changes in the local repository (directory) only. In git
there is no any feature of auto save, you have to explicitly execute the commit command
followed by message (-m “ “) tag . A message should be meaningful and easily understandable
by other developers.
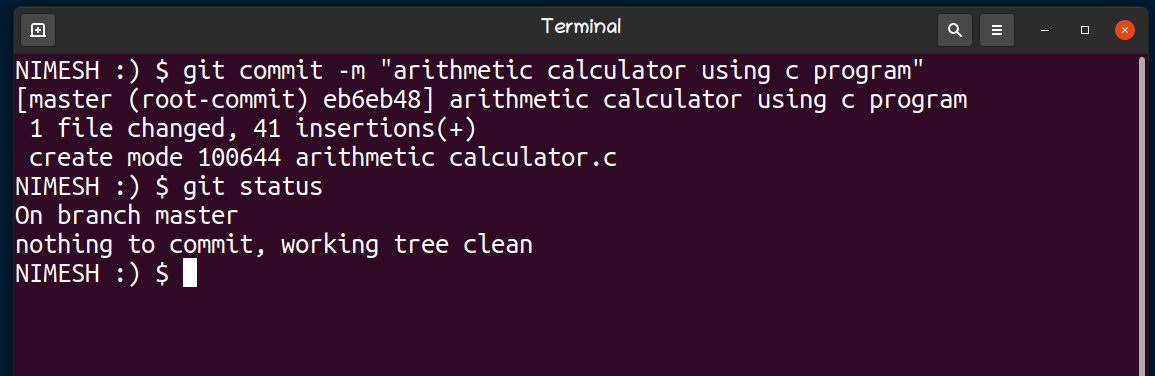
Img. 10 git commit command
Step 10: To make more secure your github account you have to generate the token for you account by using follows simple procedure.
Go to Menu (arrow near Profile Picture) Settings → Developers Settings → Personal access tokens → Tokens .
Enter details like name , time period of expiry and give permissions accordingly. I have given all the permissions.

Img. 10 Token generation process
After generating the token, copy it and save it, this token is useful for authentication purposes when pushing your code using CLI.
Step 11: Now finally we are ready to push our code to the github repository.
>git push -u origin master/main
Here -u stands for upstream i.e we are uploading .
master/main is the name of a branch. As we have not created any branch yet so we will push our code to master/main branch only.
Now enter your user name and token which we have generated in the previous step.
Hurray! your first code pushed successfully.

Img. 11 git push command
You can check your repository also on the github site.
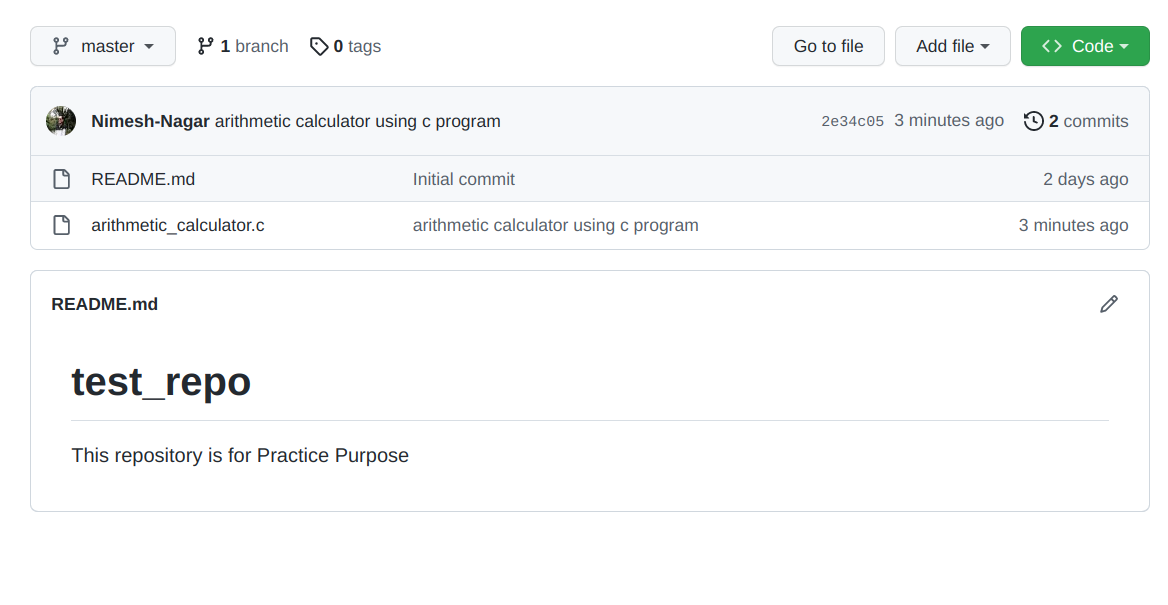
Img. 12 github repository
Github Branch :
Branch is a very useful feature of github; it allows developers to add features, fix bugs or experiment safely in their repository. A new branch is created from the default branch in your repository. Branch is always created from an existing branch.
Create New Branch:
> git checkout -b new_features
-b flag use to create new branch

Img. 13 Branch creation commands
To know which is currently active branch and shows list of branches in this repository
> git branch
The symbole “ * ” will shows it is active branch
To switch between branches use
>git checkout <name of branch>
Now switch to the branch in which you want to add your files. We will add files in new_feature.
Follow the same procedure to add files in github.

Img. 14 list and active Branches

Img. 15 Push to New Branch
Now login to your github repository and observe what changes you see.
You have noticed that your main repository has only files that were pulled in it. And the new branch has all files including which were in master/main branch also.
This is because if we want to make any changes then it is possible without affecting original codes. After your feature is ready then you can merge it with main codes.

Img. 16 new branch in github
Merge New branch to master/main branch :
Step 1: Switch to master/main branch.
Step 2:
> git merge <new branch name>
Enter the name of the branch which you want to merge with the master/main branch.
Step 3:
> git push
Enter user name and token.

Img. 17 Merge new branch with master/main
Git Ignore :
It is a very useful feature of github; gitignore is a text file which tells git to ignore the files and folders in the project.
You can ignore files like output files and files which contain sensitive information like passwords, login details etc.
We know that when we enter the git init command in the directory it will create a .git directory, in this directory there are different files and directory are present which will help to configure our git.
Now go to in .git/info there is a file named “exclude” which will help to configure git to ignore the files and directories we want
> nano .git/info/exclude
Now type dir name or file name or file extension which you want to ignore.
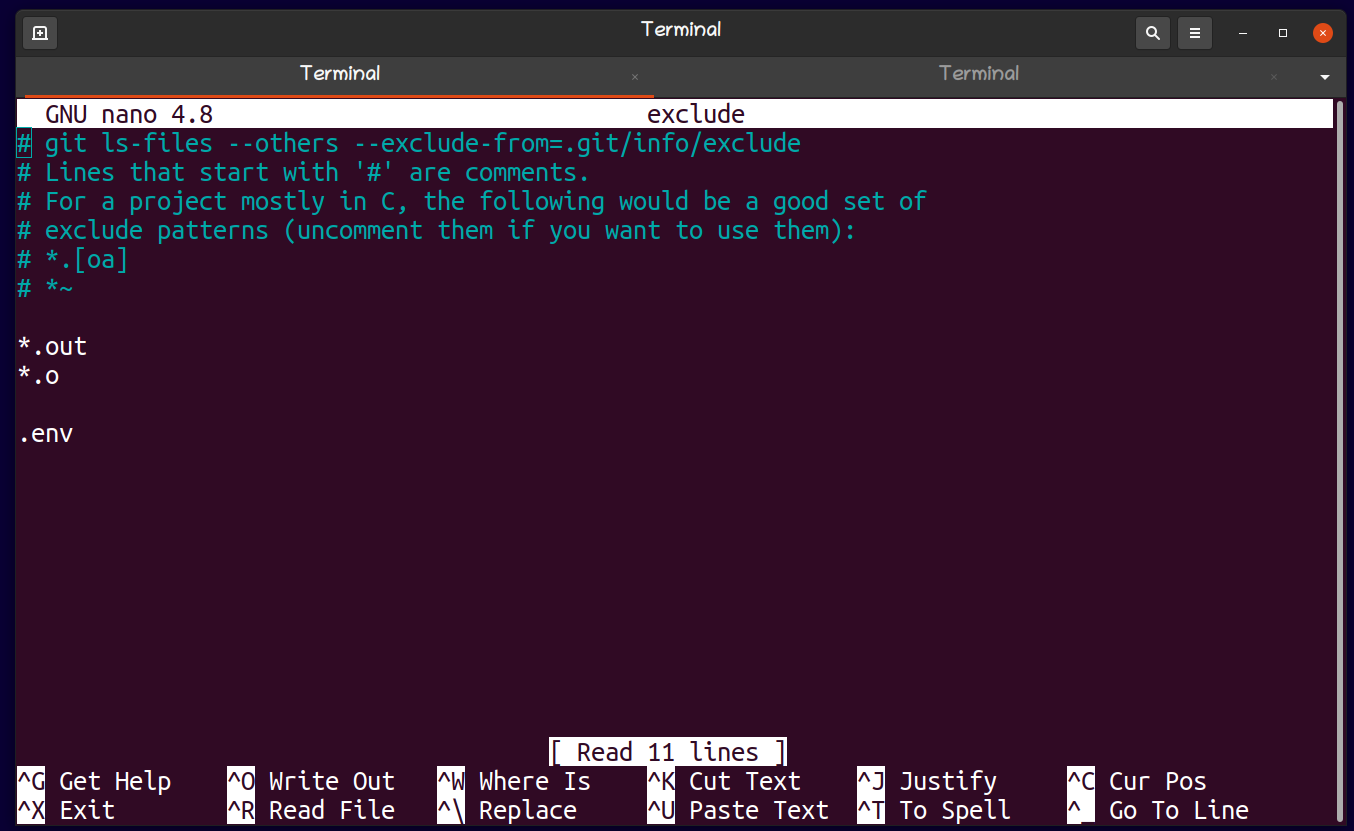
Img. 18 exclude file for git ignore rules
Now try to push files all to github. You will notice that the file with extension .out will not be pushed to the github. Because we have included this in the exclude file. Now every time we add files to this repository git will ignore all files with .out extensions.

Img. 19 github repository after with gitignore rule.
These are some basic information on github to get started.
Post a Comment
If you can't commemt, try using Chrome instead.